You see that 300×250 banner to the right of this post? Ever wonder how I got it there? Also, notice the post below this one no longer have the 300×250 ad? When this post moves to the second spot, the ad will disappear as well. Yet, when you click on the post to read it, the ad comes back. Pretty cool, huh? Here’s how to do this on your blog.
The AdSense Deluxe Plugin
The first thing you need is a WordPress plugin call AdSense Deluxe. The plugin is designed to serve Google AdSense ads on your blog but it can be used to serve any ads from any other network. I use it to serve ads I sold privately.
The plugin is very easy to use and gives you complete control over your ads. I use AdSense Deluxe to serve the 300×250, the 468×60 at the top of the blog and the 468×60 at the end of this post. Because Google allows only three ads on a page at anyone time, AdSense Deluxe keeps track of the number of ads running on a page to keep the limit at three. This is why you don’t see a 300×250 ad on any other posts except the top one. If you click on any of the lower posts, the 300×250 ad will come back in order to maintain the three ad limit.

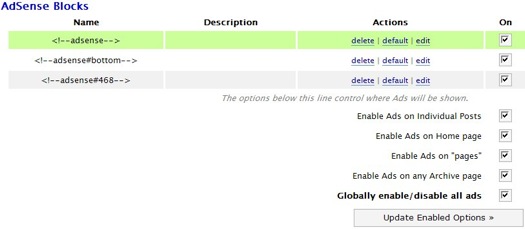
In the above screen shot, you can see I have three ad units listed; 468, bottom and default (which the 300×250). The easiest way to integrate AdSense Deluxe into WordPress is by editing your theme template. To make the 468 ad show up at the top of every page on the blog, I add <!–adsense#468–> to the part of the template where I want the ad to appear. I do the same thing for the bottom by using <!–adsense#bottom–>.
Embedding The Ad
To get the ad to show up inside a blog post I insert <!–adsense–> at the spot where I want the ad to show up. To align the ad to the right and make the text wrap around the ad, I use the following div command:
<div style="float: right; margin: 5px;"><!–adsense–></div>
The margin adds a bit space around the ad unit. You can adjust it to match your blog. If you wish to align your ad to the left side of the post, then change the float to left.
You can insert this code into your blog template or inside the post itself. I like to enter the code inside each post. This allows me better control over where the ad shows up. Most of the time, I will want the ad at the start of the post. However, there are times when I want to start a post with a picture. In those cases, I would start the 300×250 ad under the pic.
The other advantage of placing the code into each blog post is the ad will show up in the RSS feed. That increases the value of the ad spot which will make you more money. Making more money is what it’s all about, right? 😈