As of this writing, John Chow is home to over 7,500 blog posts, plus a handful of pages. My own blog, Beyond the Rhetoric, contains nearly 4,000 blog posts. These were written and published over a span of 14 years, accumulating into a HUGE mass of content. To the best of my recollection, I think I may have only deleted one or two published blog posts EVER, if at all. Given this, it is highly unlikely that an external website would link to a URL on Beyond the Rhetoric that no longer exists.
However, it’s possible through typos, copy-paste errors, or any number of other scenarios where they might link to a URL that never existed. That’s a dead link. And what happens when someone clicks on that link? They end up on the 404 error page for my domain. And while you can certainly customize or even optimize that 404 page to your liking — the 404page WordPress plugin is an easy solution if you don’t want to edit your theme files — it’s even better if no one ever sees your 404 error page in the first place. But how can you identify these dead links? How can you minimize the impact of these broken links?
Google Analytics can help. And it’s a lot easier than you might think.
1. Open Your Blog’s 404 Error Page
The first step is to see what your blog’s 404 error page looks like in the first place. And the easiest way to do that is to purposely direct yourself to a URL that you know does not exist. So, point your browser to something like: http://www.mydomainname.com/gibberish. In the case of Beyond the Rhetoric, my 404 page is hardly the most exciting thing in the world.

What you’ll want to glean from this page is the title that appears in your browser’s tab at the top. If this were a regular blog post, I’d get something like: This Is My Post Title » Beyond the Rhetoric. In the case of my 404 page, it’s set as: Page not found » Beyond the Rhetoric. The format can be customized through your WordPress theme settings, but that’s a whole other topic. What we want is that title, so for me, it’s “Page not found.”
2. Log into Google Analytics
That’s straightforward enough. Google Analytics is the de facto standard for website analytics, so if you don’t already have it set up for your blog, that should really be one of the first things at the top of your list. After you’ve set up Google Analytics (and familiarized yourself with how to understand the data), you can log into your account. Of course, you’ll need some data there before you can proceed. I’d say you should have at least a month’s worth, but more is better.
3. Navigate to All Pages
Along the left-side of Google Analytics is all of your core navigation. So, as you look at “All Web Site Data” for your blog, you’ll want to follow this navigation path:
- Behavior
- Site Content
- All Pages
Near the top-right corner, you can define the date range. If this is your first time doing this, you’ll probably want to have a rather large date range: up to a year (or more) really, if you can. After that, you can revisit these steps every month or every quarter as a general checkup. For the purposes of this tutorial, I picked a three-month window.
4. Look Up Page Titles
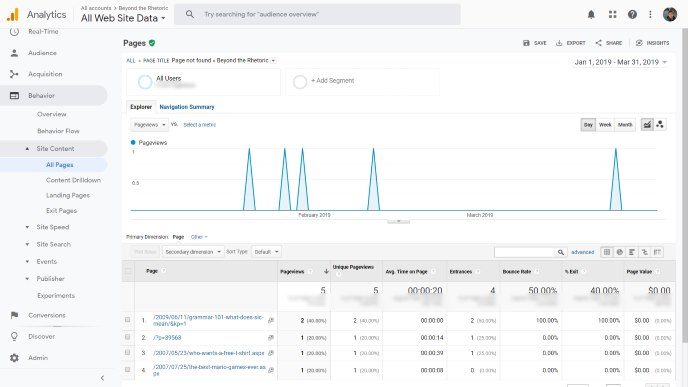
By default, the list of pages that you’ll see underneath the line graph will be formatted as the URL of the page, with your domain removed from the front. But if you look in between the line graph and the list of URLs, you’ll see “Primary Dimension” with “Page” in bold. Next to that is “Page Title.” Click on that, and the list will then appear as page titles rather than page URLs. The pages are listed by the number of pageviews they got over the prescribed date range.
Now, we’ve arrived at the part where we can look for broken links (also known as dead links). Along the bar above the list of pages, almost all the way to the right, is a search bar. In that search bar, enter the 404 page title. In my case, as you recall, it’s “Page not found.” Yours is probably the same. Conduct the search and you should only find one entry now in your table. Click on that.
5. Inspect Your Broken Links
Luckily for me, I have almost no dead links at all. In fact, over a three-month period, the 404 page only popped up for a total of 5 page views.
This report lists the URLs for which visitors to your site (which may have been bots or real people; you can’t really know for certain) were shown your 404 error page. Now, it’s up to you to decide what you want to do with that information. If the traffic warrants it, you could create new pages at those “broken” URLs, so future visitors will actually see something. More practically, setting up a simple 301 redirect is probably easier.
Depending on how much traffic you get, you might choose to repeat this process every few months. It’s worthwhile to ensure you’re both providing the best reader/user experience possible and not leaving any potential opportunities on the table.